
About...
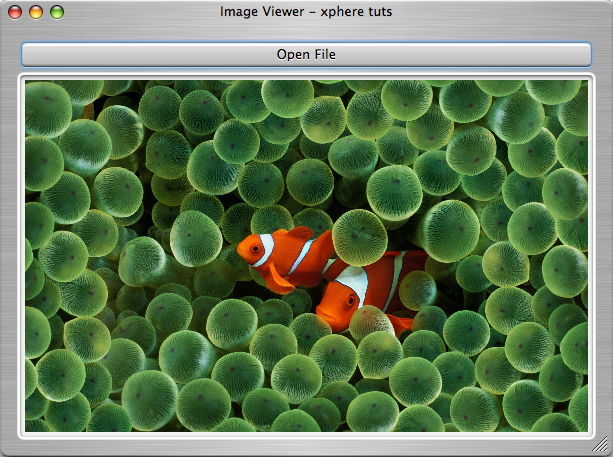
In this tutorial we will learn how to develop an app from scratch: we will do an image viewer!!The app will have one View and one File Open button. The code for opening the images will be very simple, because the Cocoa API has their own functions for opening and displaying image files. We will be able to open lots of common file formats like: jpg, tga, gif (even animated gifs!!), psd (!!) and some more.
Create the project
First we will create the project, nothing strange:- Open Xcode
- File -> New Project
- Select "Cocoa Application" -> Next
- Choose a name (for example: "Image Viewer"), select a folder and click "Finish", an empty project will appear:
Edit the Interface with Interface Builder
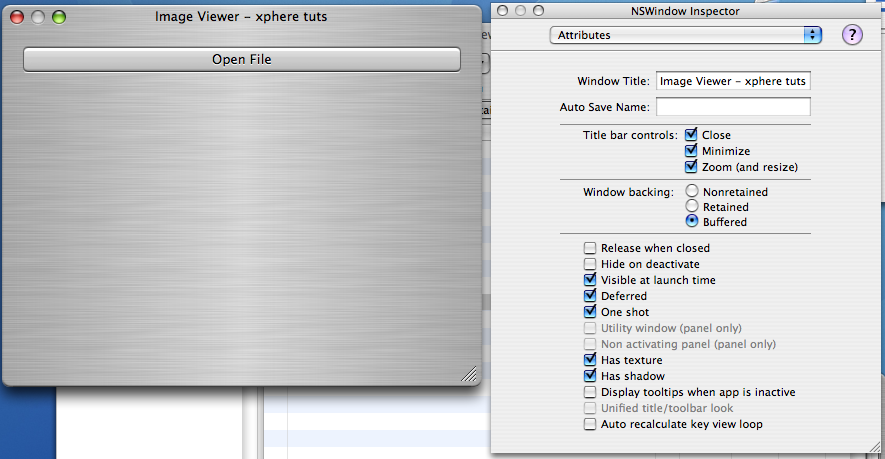
- Open the Interface Builder double clicking on the "MainMenu.nib" file (it s one of the auto-generated files).- On the main window preferences (in Inspector), select "Has texture" (well, this can make it if you want :) ). Ah! remeber to assign a title name to our window (for example, Image Viewer).
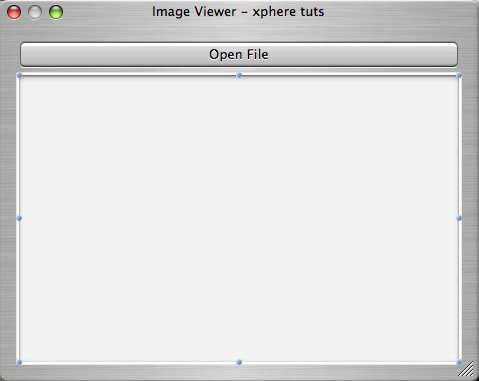
Then place one button, this button will be used for opening files, your layout should be something like this:
- Return again to interface builder, select the button, and in Inspector window choose the "size" property. And adjust the autosizing as you can see in the following image:

Now adjust the parameters for the "Image View" control, as you can see in the image:

Create the Control GUI class
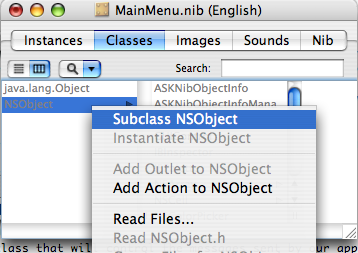
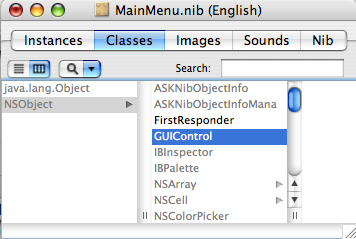
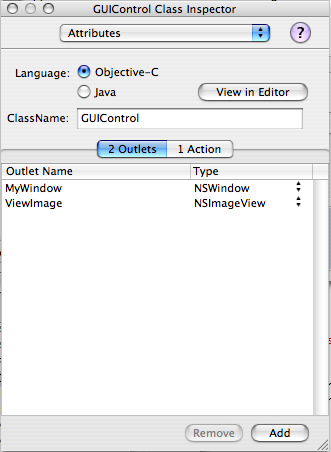
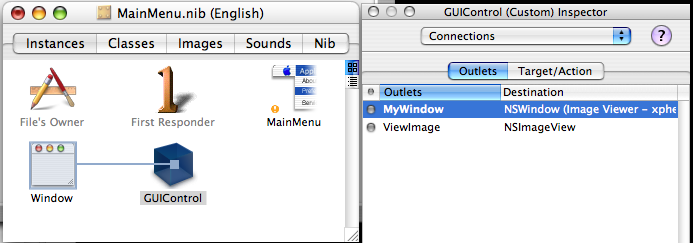
We need to create the class that will control the messages sent by our application, we have to create one Action that will be called when we select a file to open, then we will create 2 Outlets, one for displaying the image in the Image View control and the other that will resize the main window acording the size of the image.1- Select the "Classes" menu (in Interface Builder), and subclass the NSObject, name it "GUIControl":


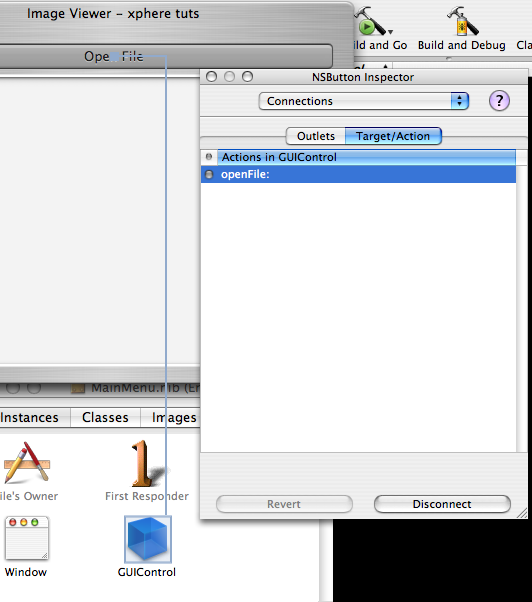
4.1 - Connect the "Open button" to our class, with the "openFile" Action:

Let's code!!
1- We will add the code to our class in order to show a standard dialog for openning files and show the image propertly, so the GUIControl class files should have this code:File: GUIControl.h
/* GUIControl */
#import
@interface GUIControl : NSObject
{
IBOutlet NSWindow *MyWindow;
IBOutlet NSImageView *ViewImage;
}
- (IBAction)openFile:(id)sender;
@end
File: GUIControl.m
#import "GUIControl.h"
#define MAX_WIDTH 800
#define MAX_HEIGHT 600
@implementation GUIControl
- (IBAction)openFile:(id)sender
{
// "Standard" open file panel
NSArray *fileTypes = [NSArray arrayWithObjects:@"jpg", @"gif",
@"png", @"psd", @"tga", nil];
int i;
// Create the File Open Panel class.
NSOpenPanel* oPanel = [NSOpenPanel openPanel];
[oPanel setCanChooseDirectories:NO];
[oPanel setCanChooseFiles:YES];
[oPanel setCanCreateDirectories:YES];
[oPanel setAllowsMultipleSelection:NO];
[oPanel setAlphaValue:0.95];
[oPanel setTitle:@"Select a file to open"];
// Display the dialog. If the OK button was pressed,
// process the files.
if ( [oPanel runModalForDirectory:nil file:nil types:fileTypes]
== NSOKButton )
{
// Get an array containing the full filenames of all
// files and directories selected.
NSArray* files = [oPanel filenames];
// Loop through all the files and process them.
for( i = 0; i < [files count]; i++ )
{
NSString* fileName = [files objectAtIndex:i];
NSLog(fileName);
NSImage *imageFromBundle =
[[NSImage alloc] initWithContentsOfFile:fileName];
if (imageFromBundle!=nil)
{
if ([ViewImage image]!=nil)
[[ViewImage image] release];
[ViewImage setImage: imageFromBundle];
NSRect frame = [MyWindow frame];
frame.size = [imageFromBundle size];
if (frame.size.width >= MAX_WIDTH)
frame.size.width = MAX_WIDTH;
if (frame.size.height >= MAX_HEIGHT)
frame.size.height = MAX_HEIGHT;
frame.size.width += 80;
frame.size.height += 150;
[MyWindow setFrame:frame display:YES
animate:YES];
}
}
}
}
@end
Let's comment some useful code:
NSArray *fileTypes = [NSArray arrayWithObjects:@"jpg", @"gif",@"png",
@"psd", @"tga", nil];
Here we define an array of filetypes that our open panel will be able to open (yes our app will opene even PSD files!!).Because it is an array, the "nil" value must be the last one.
NSOpenPanel* oPanel = [NSOpenPanel openPanel];
[oPanel setCanChooseDirectories:NO];
[oPanel setCanChooseFiles:YES];
[oPanel setCanCreateDirectories:YES];
[oPanel setAllowsMultipleSelection:NO];
[oPanel setAlphaValue:0.95];
[oPanel setTitle:@"Select a file to open"];
Here we create the the standard open panel, then we can adjust some of its parameters, like if we want to add a button for create folders directly from the panel (setCanCreateDirectories), or define the level of transparency of the panel (setAlphaValue).
if ([oPanel runModalForDirectory:nil file:nil types:fileTypes]==NSOKButton)
Here we define a conditional call, we will enter here if the OK button is pressed, otherwise, we will not enter.Then we process all selected files, the operation for opening the file will be performed with a single function:
NSImage *imageFromBundle=[[NSImage alloc] initWithContentsOfFile:fileName];
Then, if the image could be opened succesfully:
if ([ViewImage image]!=nil)
[[ViewImage image] release];
Here we check if there was a previous loaded image in "ViewImage" variable memory, so we release it (free memory). It is important to free memory in order to prevent memory leaks!
[ViewImage setImage: imageFromBundle];
Here we set the image of our "ViewImage" variable. Remember that "ViewImage" is the Outlet of our class, and we have connected that outlet with the NSImageView control. In other words, here we set the image that will be displayed by the NSImageView control.
NSRect frame = [MyWindow frame];
frame.size = [imageFromBundle size];
if (frame.size.width >= MAX_WIDTH)
frame.size.width = MAX_WIDTH;
if (frame.size.height >= MAX_HEIGHT)
frame.size.height = MAX_HEIGHT;
frame.size.width += 80;
frame.size.height += 150;
[MyWindow setFrame:frame display:YES animate:YES];
With this piece of code we are modifying the size of our window, so it will adjust to our image size. We have to respect a maximum size, in order to not oversize the resolution of our screen. We also need to increment the width and height of our window a little bit, in order to give some space at the layer for the buttons. With the "animate" parameter we are specifying that our window will resize itself with a cool animation effect :D